|
|
|
|
Open Game Maker 2D
Tutorial - Lesson 1
|
|
| | |
|
In lesson one, I will show
you how to create a game very quickly with OGM2D (actually, it is the
"quick start" in the manual).
|
|
|
|
|
| Step 1 - New a game | |
|
First, open OGM2D
and run the "Create a new game" function by clicking the
toolbar button "New game" |
|
|

|
|
|
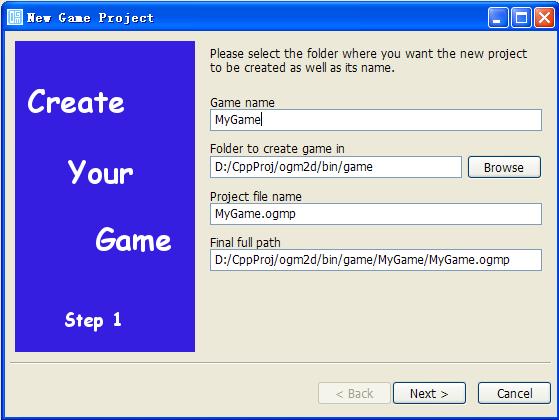
In the first screen, you have to input a name for the game and select the project's directory.
After finish them, please click "Next" button to jump to the second screen. |
|
|
 |
|
|
In the second screen, you are allowed to set game title (title of
the main window) and the name of the first scene in the game.
(A game must have at least one scene.) And also you may set the game's vedio and audio parameters in this screen. |
|
|
 |
|
|
Click "Finish" button when you finish all, and then OGM will create
the new game and open it (with its first scene) in the IDE.
Once a game is created, you may edit its details by double clicking its name in the resource list. |
|
|
 |
|
|
|
|
|
Step 2 - New a sprite and add it to the first scene |
|
|
Select the sprite page in the resource list, and
click the resource list's toolbar button "Add" to add a new sprite |
|
|
 |
|
|
In the pop-up screen, we just need to input the name of the new sprite: |
|
|
 |
|
|
After input the sprite name, we may click "OK" button to create the sprite. |
|
|
 |
|
|
Drag a sprite from the resource list and drop it onto the scene designer.
And input a new name for the sprite object in the scene, and press "OK" button
|
|
|  | |
| Final screen: | |
|  | |
| | |
| Step 3 - Add event to the sprite in the scene | |
| Double clicking the event property (OnDraw) like this | |
|  | |
| And then
OGM will add the event function automatically: | |
|  | |
| And we may edit the event function like this: | |
|  | |
| | |
| Step 4 - Build and run the game | |
| Before run a game, normally we should check and build it first: | |
|  | |
| If all is fine, we may get this output message: | |
|  | |
| And then we may start to run the game: | |
|  | |
| Finally we will get our first "Hello World" game: | |
|  | |
| | |
| | |